28 February

Would Frankenstein Be Art or Craft?


Anchorage is Hopping! Daddy-O needed to be on the Mountain for ski clinics this weekend and Gus and I decided to stay in Anchorage and be townies. Daddy-O just called us from Girdwood and said it DUMPED snow last night and he’s getting ready to take some freshies in the POW! A winter storm last week dropped a record setting blanket of snow just in time for everyone. Friday kicked off the Anchorage Fur Rendezvous Festival through March 6. Organizers were smart to time Fur Rondy

with the start of the Iditarod Sled Dog Race coming this Saturday, March 6 at 10:00 am. These Rondy pictures are of The Running of the Reindeer and the Sprint Dog Sled Races downtown. Lots of folks are in town for both, big events and Anchorage is hopping! From our house we could catch a glimpse of the Fur Rondy fire works that went off last night in downtown Anchorage. Gus is all about anything classic monster so he really, really, really wanted to see the original Frankenstein movie on the big screen at Bear Tooth Theatre Pub Saturday afternoon. His big brother Will, and Will’s girlfriend Kim came too and all of us shared a large booth. The black & white movie was fun and the Nachos, Cheese pizza, Gyro’s, Hard Apple Ale and Wild Country Raspberry Wheat Beer (Gus had Sprite) even better!

Gus and I were going to head downtown to catch some of the Rondy events before the movie but the temperature dropped a bit and we opted to go to Barnes & Noble instead (I know, we were weather wimps!) I did pick up the March issue of Art Calendar and the February/March issue of American Craft. Art Calendar has a special section on "Landing Grants," which may prove handy for my upcoming deadline tomorrow. American Craft has a good essay in the Critic’s Corner, “Further Notes on the Art/Craft Debate"

that has me rethinking my thoughts on Art vs. Craft. On my grant application I needed to check a box that described my discipline and I automatically checked “Crafts” until I read how the Foundation (on page 5) described each discipline and found my discipline fit better under “Visual Arts.” Interestingly, metal works and ceramics fall under “Visual Arts.” I can really get going on this debate and tend to probably try and simplify it a bit too much. Functionality and non-functionality aside, my simplified thought has always been Art is predominately created by using one hand and Craft predominately created by two hands. Probably a bit too simplified. Much to my chagrin, after reading the essay my brain has been spinning this debate again. I also think the category of “Visual Arts” tends to negate the debate between Art vs. Craft. Your thoughts on Art vs. Craft? Does the debate even matter?

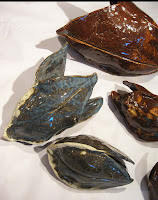
Here are some of the images I had professional photographer Chris Arend take of my clay and steel pieces. The images were wonderful and a bit tricky to shoot because of their size. Though I felt that since these were some of my first mixed medium pieces I’ve really progressed with the clay in the last few months. The “Humboldt Squid” piece is large and heavy, about 55” wide and the companion piece “Nautilus” is about 38” wide. The "Tree Spirit" is 23" tall and all three use plasma cut and welded steel with hand formed ^04-05 clay components.


25 February

Wearing A Lot of Hats


I was really mixing it up this week, wearing a lot of hats as a self-employed artist. With the deadline approaching for the Rasmuson Artist Project Grant and the All Alaska Juried Art Exhibit, I needed to complete the paperwork necessary for both of these projects. Professional photographer Chris Arend shot 3 of my wall sculptures so I could include some of my latest work in both of those applications. I picked up the digital images today and thought they turned out great. I’m working with a copy writer friend to help me proof and edit my proposal and my artist statement. She also helped me update my

Resume so it is more contemporary and applicable to the artist/grant process rather than reading like I’m applying for a job. The Rasmuson Foundation does an excellent job of outlining exactly what needs to be included and even provides a detailed checklist before submitting your proposal. Though I admit, I’m not very good at tooting my own horn and felt uncomfortable listing my professional artistic achievements as well as writing my artist statement. I wanted to sound more worldly, innovative and ground breaking as an artist. I wanted my artist statement to be eloquent, or even expressing how each of my creative endeavors allows me to explore the deeper meanings of existence or how my creative expressions ask those bigger life questions. The reality is much more simple, the majority of my art making helps me pay my bills and I’m

happiest when my art makes others happy.

It was also necessary this week for me to meet with the engineer, project coordinator and my contact at SteelFab to get the fabrication process rolling for my 1% for Art sculpture “Bicycle Bloom.” While down at SteelFab I had the opportunity to see the Anchorage Museum’s new, large, stainless steel outdoor sculpture “Habitat” getting finish welded (in the photo it was lying on it’s back). The mock-up of the sculpture was carved in blue foam also shown in one of the pictures. This has been a bit of a controversial work as expected with any large public sculpture, created by internation

ally known, British sculptor, Antony Gormley. The sculpture will be over 20’ tall and weather permitting, will be installed using large cranes on the Museum front Commons this April.

Along with all of the errands, paper work, copy writing and meetings, I managed to make some new pods and “Sedna” masks. I’m going to fire

them all at ^6 and add some sculptural steel to the clay pieces. One of the pods is over 18” long and another half dozen are a bit larger than palm size. Everything is quietly on the drying rack until at least next week. Being able to make a bit of art and wear my clay apron helped make the week feel more complete because of all the other hats I had to wear this week.

22 February

Girl POWER!


Last week a parent of one of Gus’ classmates asked me if I could make her two daughters special birthday presents for their rooms. The mom wanted out of buying yet another electronic type of present for their girls and the only other thing the girls really, really wanted was their names in large letters for their bedrooms. What a great idea I thought –the mom was getting creative which allowed me to get a little artistic! I printed out the individual, oversize letters on 8.5 x 11” paper, cut them out and connected each letter to make a one-piece name that I traced onto my plywood surface. Each name ended up being about 14” tall x 3.5 -4’ long. I bought a 4 x 8’ sheet of 3/8” MDO plywood because it has a smooth paper face on one side that sign makers prefer and then used a jig saw to cut out each name. The edges needed to be sanded down a bit before I applied a coat of

primer. My “One Shot” sign painters enamel that I use on my metal sculptures was perfect for the finish paint. It has nice vivid colors, mixes great and really pops when it is dried. I hung two “D” ring hangers on the back at each end for hanging up in their rooms. One of the girl’s rooms is decorated in bubble gum pink and the other is in lime green with white trims –pretty cool color palette huh?!

I’m usually never short on colors for inspiration… Here is a sneak peak at PART of my PEZ collection displayed in the studio. My favorites

are the vintage Pez Pals from the 60’s and 70’s. Don't ask how many we have...we actually have a stack of large Rubbermaid tubs storing the mint condition, Austrian and whole collections of rare ones. The ones in the studio are allowed to get played with -how can you not want to pick them up and pop a candy now and then?! My all time favorite sticker says “Your not really famous until your head is on a PEZ.”


20 February

Feeling the Heat

Anchorage is having unseasonable warm weather, in the 40’s! Normally we’re locked in a deep freeze –but not this year. Unfortunately with the warm temps and rain creates a higher risk for avalanches. Daddy-O just called from Girdwood and said that Max's Mountain had slid all the way to the top of the Tanaka lift(!) he said it looks like one big giant brown skid! In all our years in Gird we've never seen Max's slide to the Tanaka run. Normally the mountain crews blast the ridges with the cannons to purposely create small slides before the lifts open but this slide was all due to Mother Nature. With the daylight finally gaining time and the crazy, spring-like weather, my industriousness has been at an all-time high. Good thing too, there are several deadlines approaching and a lot of art making getting done. With each success in clay I find that my tempo increases –a bit too much. I get so happy with a clay success I really crank up my metronome.

I’m finding that working in clay takes patience and my impatience and excited fervor need to be tempered IF I want positive results. The mantra I repeat to myself is “you can’t rush clay, you can’t rush clay,

and DON’T rush clay, DON’T rush clay.” One of the main reasons my metronome is peaked is that my kiln fired fine at cone 6. I know I shouldn’t be so surprised, but I’m happy I tested it before buying a pallet load of higher firing clay. I even found some ^6 cones to put in with the test Pods and it appears that the kiln reached temperature. I only had ^6 so I couldn’t add the traditional range of higher and lower cones to the ^6 cones. Everyone that

has been encouraging me to fire at higher temps was absolutely right –I LOVE the feel of the clay fired at the higher temperature. The texture and sound of the Pods at ^6 is completely different than the trays that were fired at ^04, even though it was the same clay and well within the recommended firing ranges. With the successful bisque firing at ^6, I was ready to test the buckets of mystery glazes that are supposedly also ^6. I had 6 test Pod sculptures and tried two different glazes, the Galaxy (a blueish gray green) and Antique Iron (for some reason I thought this would be blackish like iron but it fired rust colored -duh, ANTIQUE iron would be rusty, what kind of metal chick am I anyway?!). The Galaxy was just as I had hoped and the Antique Iron, though a nice color would not be a top pick. I purposely rubbed off the glaze along the seam of the Pods so I cold still see and feel the clay. Fresh from the kiln, the warm Pods felt so wonderful in my hands! I did lose two of the six Pods in the glaze firing though. One small Galaxy glaze fired Pod appeared to have exploded(?) because there were shards on the shelves and one of the small Antique Iron Pods appears to have tipped over, maybe during the explosion, and broke a leaf tip off. I’m so happy with the results of the Galaxy glaze that the broken Pods didn’t bum me out too much. It was more of a shock to see the bits and pieces in the kiln. At first I wasn’t even sure what they were because I haven’t had an explosion in a while. I must be making progress!

Adding to my clay excitement the clear glaze load of tiles and trays fired beautifully at ^05. I wanted to repeat some of my favorite sgraffito designs that were on the first batch of trays that didn’t turn out. I liked how the Coloramics NM-450 Clear Soft Matte, made by Mayco applied with only two coats. The load was a bit more shiny than I like, but hey, at least it was uniform and was successful! I bought plate hooks to secure the tiles/trays so they can be hung on the wall. With some new clay Pods drying on the shelves now, I need to switch gears and tend to some upcoming deadlines. The Rasmuson Foundation Individual Artist Awards grants deadline is March 1. I’m applying for an Individual Project Award grant to hopefully help fund some future clay work and a visit to North Carolina for the “Clay and Blogs; Telling a Story” of which I’ve been invited to participate in. Here is a link to Mered

ith Heywood’s Blog, Whynot Pottery, she is the curator of the Show. I've got my work cut out to submit 3 incredible pieces by October - I'm practicing though!! Scroll down her Blog and to the right is a link to all of the artists and their Blogs that are in the Show. The Mt. View 1% for Art Outdoor Sculpture project process has also started. On Thursday I met with SteelFab to outline the fabrication specs for my sculpture “Bicycle Bloom,” that was selected and we saw the project site and are working on the fabrication details. We’ve got a meeting with the engineer on Monday and the foundations will be

ready to be poured as soon as the building season allows. With the way the weather is might be much sooner than later. PLUS, I just saw that the Anchorage Museum of History and Art All Alaska Juried Biennial Art Exhibition XXXIII deadline for submissions is March 2! I have received several solicitations to donate for the upcoming annual Museum Gala, but did not receive a prospectus in the mail for the All Alaska Juried Show… For all my Alaska artist friends, here is a link to the prospectus. Hurry, deadline for digital submissions of works for the All Alaska XXIII Show is a week from Tuesday!

17 February

Open Sesame Part Deux


The second set of trays/tiles fired beautifully. I think I have the lower temp bisque firing down, it’s the glazing that I’m needing to find a little magic. Well, I shouldn’t speak too soon…the first set of pods I made are firing now at cone 6. This is a “test” firing at cone 6 because I’m not sure how my kiln will do at cone 6. When I bought the second kiln used last year it did come with a ton of misc. supplies stuffed in this large set of plastic storage drawers. Some old, some new but in the “lot” were several boxes of large and small cones, including cone 6, so I’m optimistic all will be well… Also included in the supplies were several Duncan French Dimensions Fired Color Accents in cute little squeeze tubes. I tested the French Plum on a Raven tray the last load and liked the high pile effect. I used the French Dimensions as berry’s on

the sgraffito branches because when it fires it remains raised up and didn’t seem to run or bleed. Again, we’ll soon see! I’ll fire this load of glaze as soon as the cone 6 test pods are done…

Even with the holiday on Monday it’s been full on art making this week -whew! Between getting the metal sculptures boxed and shipped, clay loaded, unloaded and glazed, I’ve been volunteering to help Gus’ sixth grade class create the backdrop scenes for their upcoming school play “The Princess and the Pea.” I wish I had the same team of 12 stagehands working in my studio!

I couldn’t believe how they made short time of getting several plywood backdrops primed -youthful energy is an amazing thing! Kristen, our oldest has started a Blog, Rosie Creek Quilts. In addition to her many academic gifts, she has always been a talented writer, illustrator and now fiber artist. Up in the (more) frozen North of Fairbanks, she entered a quilting contest that had the theme of using a snowman. You have to see her original design, because if she gets burned out with her Chemical Oceanography and her Academic

career path, she’ll always find work as an artist. Kristen we LOVE, LOVE, LOVE your snowman piece!

14 February

Lovin' on the Tiger


Happy Valentines Day and Chinese New Year! This is my year so to speak, Year of the Tiger. Chinese New Year or Spring Festival is the most important of the traditional Chinese holidays and is the longest and most important festivity in the Chinese Lunar Calendar. According to Chinese astrology, a person’s destiny can be determined by the position of the major planets at the person’s birth along with the positions of the Sun, Moon and comets and the person’t time of birth and Zodiac sign. The Chinese calendar is based on a combination of lunar and solar movements. The lunar cycle is about 29.5 days. In order to "catch up" with the solar calendar the Chinese insert an extra month once every few years (seven years out of a 19-year cycle). This is the same as adding an extra day on leap year and why, according to the solar calendar, the Chinese New Year

falls on a different date each year. Today marks the start of Year of the Tiger! Here is a link to find out what your Chinese animal sign is.

While the new clay pieces are drying on the racks, it was a week of full on metal production, plasma cutting and welding Valentine gifts for special orders and finish painting several new metal

sculptures for Fireweed Gallery in Homer. I’ll be shipping these new floral and octopus pieces along with several other works to Homer this week. It’s a sweet shipping set up using The Stage Line, transportation to the entire Kenai Peninsula, allowing me to pack an entire bicycle box that is conveniently driven down to Homer for about $45. Sweet son Will took the above picture of me painting in the studio because I was too swamped to go out to lunch with him so we ordered in. I’d like to fire a bisque load tomorrow and have room to glaze, so my plan is to get all of the metal sculptures boxed and shipped to make room for the clay tiles and trays Tuesday. In the meantime, there’s lot’s of Valentine Day kissin', lovin' and huggin' goin' on here in the original Girdwood Love Shack!

The B-52's Love Shack was our wedding song -Bang-Bang Baby!

oxOxo

11 February

Check Out "Ski Instructor Derek"

Alyeska's most famous (and handsome!) ski instructor, Daddy-O, gets James carvin' it up in record time. KTUU's weather anchor and Channel 2 News Morning Edition host, Scott Elnes filmed the action for his popular, GoToAK.com Blog in Spa & Ski Part II. You can check out Part I of Spa & Ski here. Scott says Derek had his cameraman James "skiing like a Rock Star in no time!"

09 February

Inspired Assignment


Taking Michael Kline’s 12 x 12 challenge was a good exercise to get my pods made. His assignment was to make 12 things by 12 noon. Well, I got 6 pods made, and as the hour closed in my pods were becoming smaller and smaller! They were a bit more time consuming than I had anticipated, especially considering that these are really TEST pods… you know how I feel about testing anything. This test is really important though, because I need to see how my kiln fires ^6 temps. The clay I’m using is that Seattle Pottery Alpine White SP655 I bought ($16 /25#) from the local ceramics lady. It’s a ^04-6 clay that “handles like a stoneware (which it is) but fires with the smooth look of porcelain.” Not really that great for hand building but it’s all she had in mid range clay for me to fire at ^6. I had collected some Iris seed pods from the garden and was surprised to find they have withstood the snow, wind, rain and moose.

I loved Nature's shape and her 4-season's design, inspiring me to create them in clay. My idea is to hand shape the pods in clay and weld steel stems and leaves in a vertical free standing sculpture. For texture I used some sturdy art paper I had in my “textures bin” and rollered the leather-like paper over my individual pod leaves. To keep the pod forms full, I stuffed newsprint in their bases and draped the larger completed

pods over soap bottles. The idea is the pods will be attached with copper and steel wire and incorporated into the 6’ tall welded steel sculpture. The pods as well as my second batch of sgraffito trays/tiles are on the drying racks now. With my “assignment” completed I cleaned up my mess like a good student should so the studio is ready for this week's metal. Check out the other results from Michael's 12 x 12 challenge here. While the clay is drying, I’m switching over to welding this week making a couple of Valentine special orders that came in. I’ll need to clear the studio main work table of clay dust so the steel sculptures I’m welding up can

get finish painted with enamel. Today it's back to wearing leather, armoring up, plugging in and letting the sparks fly!

06 February

This is NOT a Test


Clay is a fickle lover. Popped the top on the SECOND glaze firing… yes, I tried refiring my sgraffito trays/wall tiles thinking I could smooth out the milky-splotchyness of the matt glaze. I had a bit of varied results on the whole load. Couldn’t pinpoint what exactly the issue may be but I was disappointed in most of the pieces. I was hoping for better results considering I used the utmost patience –for me anyways! I THOUGHT, I mixed enough, brushed on enough and let dry enough, even had the kiln controller set to the correct schedule and cone temp of ^05 and even waited beyond the cool down to open the lid. I’m learning (the hard way) that working with clay, you can’t test enough. I’ve admired all the testing Judy Shreve, of Mountain House Studios, has been doing on her Terra Sig journey. Tracey Broome has taught me a lot with her glazing pinhole issues and I admired her for continuing to forge ahead. Reading each post and seeing her photos I could totally identify with the building frustration with each exhaustive round of troubleshooting. It doesn't seem

fair to have a perfectly beautiful piece be ruined at a final stage of firing on a technicality. Clay artists should be able to have a do-over, or some sort of warning flag or digital message that gets sent to us WAY before you open the kiln to disappointment. I know, I know, then we wouldn’t be working in C L A Y –ha!

Above, the Heart tray/tile (used the Amaco Matte glaze) did come out pleasing enough, as well as the small Leaf w/handle tray (used the Coloramics Soft Matte glaze) but the others were not uniform, and on a couple of pieces the black underglaze was altered (the sunflower and Raven Moon pieces being the worse -below). I used two different glazes, the

most successful glaze used was the Coloramics NM-450 Clear Soft Matte, made by Mayco, the other glaze was a Transparent Matte LM-10 by Amaco. The Coloramics only needed two coats and brushed on much nicer than the Amaco. Really none of the pieces using the Amaco Matt Liquid Matte glaze turned out well. A positive was the brightness and true colors (red, yellow, blue and black) of the Duncan E-Z Strokes Underglazes, I love those. Trust me, I’m not totally blaming the material, this seems to be more artist-operator error.

Either the kiln temp/schedule not being quite right (it did fire quick and under 5 hours), glaze too thick, not thick enough or not properly mixed. The good news is I have more sgraffito trays/wall tiles on the drying rack and the Coloramics glaze that I had success with, I have more of. I used up all of the Amaco Mate, so this next batch I’ll use all Coloramics, Clear Soft Matte. I will admit that even with a bit of disappointment, I still don’t think I’m EVER going to be one of those artists that will make tons of tiny test tiles and fire load after load of test firings. Especially since I have a STACK of those smallish tiles, I made over a year ago sitting on the bisque shelf... I’m one of those artists that will just be giving friends and family all my seconds (and thirds) for every conceivable Holiday. Spoiler Alert; Mom, your birthday is this month!!


04 February

Open Sesame...


WHEW! The kiln load of sgraffito fired beautifully. The underglaze colors really popped –I was happily surprised, especially with the red and yellow. Very fun and vivid. I know I shouldn’t be so doubtful, but I’m one impatient artist, especially for EVERY phase of working in clay. The hardest part is waiting for the kiln to properly cool before I pop the top. Which I did, I actually waited until my controller said it was below 150 degrees –I think that’s a waiting record for me. On several of the sgraffito trays I used highly textured borders that I may or may not have attached very well –but it turns out I did attach them well and when I slab rolled the clay, I may or may not have wedged it properly or long enough –but it turns out I did. No explosions or breakage yet… Up next is my most UNfavorite part –glazing –arrrggh. I’m using a Amaco Clear Matte ^04 which unfortunately needs to be brushed on as I don’t have enough for dipping –dipping seems like my kind of glazing!

Oh well. The goal of trying the higher fire clays and glazes will be buying bulk glaze and putting it in DIPABLE 5 gallon buckets. Keeping with the mood of patience my mantra will be; “I will apply three coats as the instructions recommend, I will apply three coats, I will apply three coats, AND LET EACH COAT DRY BEFORE THE NEXT COAT IS APPLIED O o ohhhmmm!