Showing posts with label Clay Pods. Show all posts

31 May

Transfer Fits and Starts


How is it when faced with a deadline my head becomes filled with additional ideas and projects?! I can shoot off in a completely different creative direction at any given moment when faced with a deadline –and still force myself to make the deadline! My advertising agency days not only taught me the art and discipline of billing in 15 minute increments but creative multi-tasking must have been seared into my brain as well. At this point in my career I admit it wears me out. Or to be honest, when I shoot off in another direction, with all of the effort I exert I expect success with every endeavor. I realize that’s not very realistic or conducive to the art of making art.

Where things took a left was when I became inspired after watching a

YouTube video on “Recycling a Beverage Can to a Digital Print.” (I know, being on the computer can be such a time-waste-vortex!) My mind raced with ideas of imagesI wanted to transfer onto the steel bases with welded “branches” as borders. I was going to cold rivet the aluminum panels onto the steel bases –even using funky, cool copper rivets with little brass and aluminum washers as added details. On his visit to the hardware store, Daddy-O was even kind enough to buy me a big role of aluminum flashing to feed into my as yet un-purchased printer! I’ve mentioned before I am constantly intrigued with learning how to use various transfer methods on EVERY type of sub-straight material. My original idea was to use the Lesley Riley TAP Sheets I purchased a few months ago, and had been saving, onto the steel but it didn’t work so hot. I ate up 3 of the package’s 5 sheets trying for a smooth and even image. I’m not sure if the paper is too old or what, but I was really disappointed. I even visited the office supply store yesterday to buy a "straight pass through" ink jet printer as

shown in the video (this would be my 4th new and different type of printer) that could be fed the thicker media like the aluminum but I can’t find one in town with the straight pass through feed feature that’s under $1,000. I’m back to probably using a Gel Medium Transfer with color laser prints (thankfully, I already have a really nice HP color laser printer). I’ll need to go to the art supply store today and buy more Gel Transfer Medium -but at least I know the transfers work on steel because I’ve used this process before. I just really wanted to try this ink jet application on aluminum –darn-it!

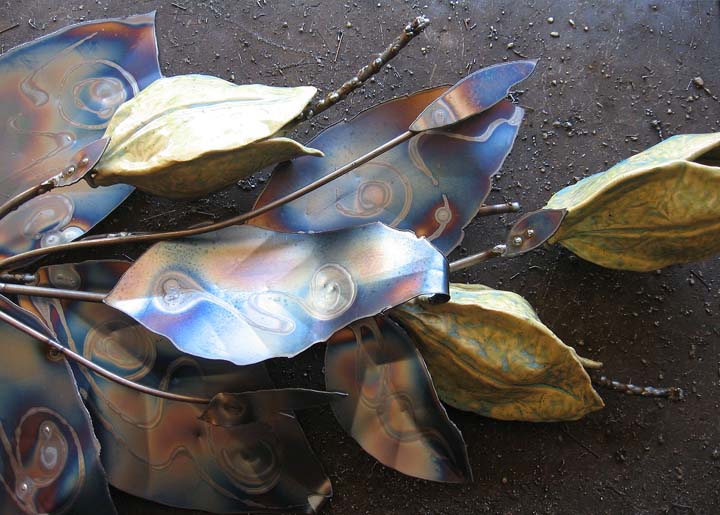
My First Friday Show opens at Katie Sevigny’s Gallery, Friday, June 3rd. THIS FRIDAY –how can it be June already, where did May go?! For the last few weeks I have been working on several pieces that I’m really pleased with, including wall sculptures that I’m finally using my clay “Pods” in. I will also have a couple of masks using hand built clay combined with plasma cut and welded steel and copper.


23 March

WYSIWYG, or not?


As the alarm clock rang 5:30am Monday morning I popped right up remembering I could peek at the ^6 load. No reading the newspaper in bed with my sweetie this morning. In my jammies I ran out to the shop and lifted the still warm lid… Truly, I said to myself “if this kiln load is a total disaster let it be big so at least it will make a good Blog post!” Well, no graphic explosion images or total glaze meltdown shots, just some mediocre results. At least my large Pod survived and actually turned out OK. Not FAB,

just OK. I intentionally rubbed off the glaze on the lower leaf areas on my large Pod. The big surprise was my “sure fire” Pods, the ones I’d already used the Galaxy glaze on, appeared this time like the glaze had settled out -Arrrggh! I was trying to have a set of at least 3 matching Pods for a sculpture. These were supposed to be fine because I’d already lovingly TESTED this glaze. In one of the photos the original Galaxy fired Pod is on the left and this latest Pod I'm holding is on the right. What the...?? Another set of Pods I used the Seamist glaze on really looked like the glaze settled out (they are the small ones on the right in the large photo at the top). I could see miniscule spots where if that glaze

had worked as I’d hoped it would, it would have been beautiful, but it was not to be. There could be a lot of explanations for the “settling out” considering that these glazes were purchased blindly used with no dates, instructions or firing details on the buckets. I’ve read about microbes destroying old glazes or freeze/thaw and heat temp issues negatively affecting the necessary “float” of glaze components. Or not(?) Who knows. It’s just that after the first firing using the Galaxy and Antique Iron I did have high hopes, especially considering I mixed the second batch even more slowly and evenly. I set the kiln controller to use a SLOW FIRE ^6 GLAZE schedule, HOLDING for another 25 minutes for good measure. Or not(?) I am learning not to plan a sculpture using my clay components until AFTER they are completed to satisfaction. WYSIWYG (What You See Is What You Get) was a term we used in my graphic design business days of what appeared on your computer screen was not necessarily how the file would be printed at the printers. There were so many digital variables we were forced to check and recheck a file before it was sent off to the client, publisher or printer. I’m learning that even when I’m working with clay that “What You See, (is NOT necessarily) What You Get until after the LAST firing!”

Kristen sent me this picture of her sliding down the ice slide at the World Ice Art Park in Fairbanks! She was wearing her favorite Skhoop Skirt over her snow pants and she said she took off like a rocket! I noticed on the news last night that Fairbanks warmed up to a balmy 25 degrees ABOVE zero yesterday! Spring must be on the way.


20 March

Do Scientists Get Nervous?


Something changed this morning as I was getting ready to glaze my Pod forms. I didn’t approach the set-up and glazing as fearlessly I normally would have. There was a nervousness I felt as I was prepping the tools and Pods –I even cleaned the mixing tool on the drill TWICE! I’m afraid any foreign debris might cause some sort of failure in the glaze or my carelessness and un-cleanliness could lead to a total catastrophic kiln firing failure. I'm also a bit nervous using the mystery glazes because I've only "tested" two of the colors and want to try two more on this set of Pods. One mistake I think I’m already making is I’m in love with these Pod forms and I know I shouldn’t even start the affair until after they have finished their time in the kiln. I am learning that planning ahead is a good thing and patience and cleanliness are also just good clay practices –all things that don’t come naturally to me. I’ll probably need to come up with some new rules…

The new steel wall logo installation went well this week though that project also had me nervous. Dr. Murray’s office is a GREAT client and knew exactly what they wanted. I ended up changing my process when the first set of letters didn’t turn out as expected. Originally, I had an electronic eps file of their logo water-jet cut from of 18 gauge steel but the letters were way too rigid and mechanical looking. I was trying to replicate their calligrap

hic look in steel –it wasn’t easy. I ended up scrapping the first set of letters that I’d already paid for, and plasma cutting by hand the “M” and the “O” myself. This helped to better create the purposeful rough edges as in their calligraphy styled logo. One of the prerequisites of the wall sculpture made by their office manager, Jo Lynn pictured at the left in the photo with Dr. Murray, was that the “M” to be heat treated to the steel blue. This limited the materials I could use because I can

only get that heat treated look with the black iron, not aluminum. I was so nervous to deliver the piece right up until Jo Lynn and Dr. Murray both gave it the two thumbs up! WHEW. I swear, sometimes commissions can really get my stomach in knots.

25 February

Wearing A Lot of Hats


I was really mixing it up this week, wearing a lot of hats as a self-employed artist. With the deadline approaching for the Rasmuson Artist Project Grant and the All Alaska Juried Art Exhibit, I needed to complete the paperwork necessary for both of these projects. Professional photographer Chris Arend shot 3 of my wall sculptures so I could include some of my latest work in both of those applications. I picked up the digital images today and thought they turned out great. I’m working with a copy writer friend to help me proof and edit my proposal and my artist statement. She also helped me update my

Resume so it is more contemporary and applicable to the artist/grant process rather than reading like I’m applying for a job. The Rasmuson Foundation does an excellent job of outlining exactly what needs to be included and even provides a detailed checklist before submitting your proposal. Though I admit, I’m not very good at tooting my own horn and felt uncomfortable listing my professional artistic achievements as well as writing my artist statement. I wanted to sound more worldly, innovative and ground breaking as an artist. I wanted my artist statement to be eloquent, or even expressing how each of my creative endeavors allows me to explore the deeper meanings of existence or how my creative expressions ask those bigger life questions. The reality is much more simple, the majority of my art making helps me pay my bills and I’m

happiest when my art makes others happy.

It was also necessary this week for me to meet with the engineer, project coordinator and my contact at SteelFab to get the fabrication process rolling for my 1% for Art sculpture “Bicycle Bloom.” While down at SteelFab I had the opportunity to see the Anchorage Museum’s new, large, stainless steel outdoor sculpture “Habitat” getting finish welded (in the photo it was lying on it’s back). The mock-up of the sculpture was carved in blue foam also shown in one of the pictures. This has been a bit of a controversial work as expected with any large public sculpture, created by internation

ally known, British sculptor, Antony Gormley. The sculpture will be over 20’ tall and weather permitting, will be installed using large cranes on the Museum front Commons this April.

Along with all of the errands, paper work, copy writing and meetings, I managed to make some new pods and “Sedna” masks. I’m going to fire

them all at ^6 and add some sculptural steel to the clay pieces. One of the pods is over 18” long and another half dozen are a bit larger than palm size. Everything is quietly on the drying rack until at least next week. Being able to make a bit of art and wear my clay apron helped make the week feel more complete because of all the other hats I had to wear this week.