Showing posts with label clay. Show all posts

07 August

Meet Wendy Gingell


Meet my friend Wendy Gingell of Gingell Ceramics. Wendy recently moved to Alaska from Washington and we have become fast friends, nudging one another out of our studios for weekly, girly-artist breakfasts, Farmer Market meet-ups or a quick morning of coffee fun! I'm fascinated by Wendy and her work -she's even attended the BIG east coast shows and her work is collected by loyal customers across the country. While unassuming she is also fearless. I want this to rub off on me. Wendy creates "hand built and functionally made ceramics, with love and heart especially for you." My favorite are her "little emotional monsters" pieces. The photo at left is of Wendy at the Spenard Farmer's Market this summer. If you are not able to attend a SOFA show or can't make it to Boston or Chicago -come see her on Saturdays at the Spenard Farmer's Market here in Anchorage! Wendy recently interviewed me for her series of artist interviews. Meet Wendy and maybe get to know a little more about me too, right here.

14 September

Clay and Blogs: Telling A Story


I shipped my clay piece to North Carolina yesterday for the Clay & Blogs Show. As I was boxing and bubble wrapping, at the last minute I swapped out what I was going to send for the piece pictured above. The wall tile is one of my most favorite pieces that I was saving for myself. The sgraffito illustration shows how my heart feels about working in clay. This was a bittersweet moment. A couple of years ago at this time, I had high hopes of working more in the medium of clay to compliment my metal work. I purchased a couple of kilns, electronic kiln controller, had my electrician accommodate the additional power needed, loaded up on tools and materials, got a new slab roller, saturated myself with wonderful ceramic books and regularly had my hands “in the mud.” I loyally followed several clay blogs and learned more from these clay artists and potters who Blog than from all of my books combined. However, recently I made the difficult decision to move on from spending a lot of time with clay and started downsizing the amount of space dedicated to clay in the studio and "gifted" my clay related materials and tools. The most difficult part is that the majority of artist Blogs I follow and enjoy are clay Blogs. I feel like a deserter. I’m normally not one to not finish something I started and to not be focusing on clay makes me feel like a quitter. But the truth is I found working in clay too unpredictable. I also discovered I don’t have the “patience” (a key word for working in clay!) or the stomach for failures. The process of firing, glazing and firing, to me, was a real science that needed a lot of practice and experimentation –technical ability helps a lot too. I was so looking forward to attending the Clay & Blogs Show in North Carolina that I even applied for a grant to travel to NC and further my exploration in clay. I know I could have been easily inspired by all of the talent in the “pottery capitol of the world” though it was not meant to be. The grant or the trip. So yesterday, as I shipped my piece to the Show it was actually a bit sad as the well-packed box tumbled into the gaping metal mouth of the USPS receptacle, a bit of literal closure if you will. My solace is that the wall tile and therefore a small bit of me will be among those great potters at the Campbell House Gallery in Southern Pines, North Carolina October 1.

The show is the brainchild of Meredith Heywood of Whynot Pottery in Seagrove, NC. It's called "Clay and Blogs: Telling a

Story" and brings together 50 potters from throughout the U.S., England and Australia. Click here for a link to Meredith's Blog with a complete list of those participating and links to their Blogs. In addition to the Show at the Campbell House Gallery, there is an Online Exhibition. If you're like me and can't make it to North Carolina, you can take a virtual tour of the on-line portion of the Show.

27 August

Be Brave

Art making requires a certain amount of bravery. I feel to truly create art, an artist pushes their medium of choice. I was reflecting on Katie’s color bravery and how brave an artist needs to be to put their art out in the public eye for all to see (and critique) and for me, hopefully sell. When I started Blogging I was taken by how many potters share their firing schedules, or glaze recipes and bravely share their wins and losses. I also noticed how brave Linda Starr was in her clay work. Linda was trying different clays, finishes, textures and even barrel firings, publishing the good with the bad, publishing the truth. When I worked in clay I found I wasn’t brave enough to attempt new things. I wanted a “win” with every firing, a “sure thing.” I seemed to always have silly rules to what I could make and what I couldn’t make. That’s not true art making or pushing clay beyond the expected.

I’ve said before that I feel Clay is a fickle friend, even though when I work in the medium of clay I feel closer to the earth and art making. Unfortunately, what has restrained me is there seems to be no “sure-fire” –pun intended, guarantees to the making, glazing and firing cycles. For me that’s been the beauty of it and the angst of the medium of clay. Clay has taught me that patience pays off and also that potters are some of the most information sharing Bloggers I read. I’ve also confirmed that artists who choose to work in clay are some of the most underpaid. Working in clay is usually never about money –except how much supplies can cost, or how crazy shipping costs are to Alaska! Working in clay seems to be a passion to those who dedicate their art making to living the “potter’s life.” Opening the kiln after a firing (and forcing myself to wait until a proper cooling temp was reached) always seemed like Christmas morning and the added bonus was opening a kiln after a glaze firing and seeing the glazes sparkle like jewels in a cave. I even love seeing other potter’s kiln peek shots on Blog posts, I become giddy wanting to hold those warm pieces in my hands. While I may have the desire for clay, what’s been missing is the bravery. It’s been a difficult decision, but it’s time for me to move on from working in clay, give it a rest until I am able to more freely experiment, lift my self-imposed rules and be CLAY BRAVE.


My last firing included a large sculptural Raven, one of my fish heads and a mask -and it was SUCCESSFUL!

17 February

Open Sesame Part Deux


The second set of trays/tiles fired beautifully. I think I have the lower temp bisque firing down, it’s the glazing that I’m needing to find a little magic. Well, I shouldn’t speak too soon…the first set of pods I made are firing now at cone 6. This is a “test” firing at cone 6 because I’m not sure how my kiln will do at cone 6. When I bought the second kiln used last year it did come with a ton of misc. supplies stuffed in this large set of plastic storage drawers. Some old, some new but in the “lot” were several boxes of large and small cones, including cone 6, so I’m optimistic all will be well… Also included in the supplies were several Duncan French Dimensions Fired Color Accents in cute little squeeze tubes. I tested the French Plum on a Raven tray the last load and liked the high pile effect. I used the French Dimensions as berry’s on

the sgraffito branches because when it fires it remains raised up and didn’t seem to run or bleed. Again, we’ll soon see! I’ll fire this load of glaze as soon as the cone 6 test pods are done…

Even with the holiday on Monday it’s been full on art making this week -whew! Between getting the metal sculptures boxed and shipped, clay loaded, unloaded and glazed, I’ve been volunteering to help Gus’ sixth grade class create the backdrop scenes for their upcoming school play “The Princess and the Pea.” I wish I had the same team of 12 stagehands working in my studio!
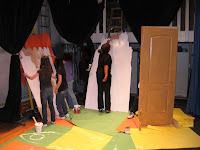
I couldn’t believe how they made short time of getting several plywood backdrops primed -youthful energy is an amazing thing! Kristen, our oldest has started a Blog, Rosie Creek Quilts. In addition to her many academic gifts, she has always been a talented writer, illustrator and now fiber artist. Up in the (more) frozen North of Fairbanks, she entered a quilting contest that had the theme of using a snowman. You have to see her original design, because if she gets burned out with her Chemical Oceanography and her Academic

career path, she’ll always find work as an artist. Kristen we LOVE, LOVE, LOVE your snowman piece!

19 August

Fish Float


What a better way to celebrate back-to-school than have a clay day! Yippee for me. With everyone back to school this morning I met a friend for breakfast then came back to my studio and pulled out the clay. It’s been way too long since I’ve been able to get my hands muddy. So long in fact that I needed to cull some partial bags of rock hard mystery clay and double check some other supplies. I really wanted to make a fish head mold today using a lovely salmon head I had put in the freezer 


a couple of months ago. I especially loved the lines on the underside of the fish near the gills and could see a whole wall full of various clay fish heads! I had plenty of Potter’s Plaster but had to pull out a couple of chunks that had hardened from a little moisture, but the rest was still powdery fresh. When I measured the height of the salmon head I noticed that the head was too tall for my existing mold boards that Bill Sabo and I had used on our whole fish casts. I cut new wood and made a mold that was tall enough, laid clay on the bottom and in the seams of the mold. I used a nonstick cooking spray on the boards for good relief once the plaster would be dry. Here is a video on making a one-piece plaster mold from Ceramic 

Arts Daily. There is also a handy chart for the water to plaster mixing consistency.

Dressing the salmon head was a bit tricky. After he thawed a bit, I noticed one of his eyes was damaged and his mouth wouldn’t close so I mended those areas with clay. I also needed to build up a base for the head to attach to and sit on since I couldn’t have any undercuts so the fish head could be removed from the hardened plaster cast. Once I had the heal all cleaned up and details showing I mounted the head to the clay base in the mold, readied my plaster and began pouring. 

I had enough plaster that I had also wanted to make some slump molds for slab work and decided to pour the fish head last. As I scraped the last little bit of plaster into the mold holding the fish head, all of the sudden that fish head had released from the bottom of the mold like a beach ball being held under water AND SHOT UP THROUGH THE TOP OF THE LIQUID PLASTER! Dropping my plaster bucket on the ground, I screamed as the head bobbed gently in the warm liquid, ghost-like and staring at me with it’s one good eye! I was not even expecting that and it scared the bejeezus out of me! 


After I composed myself, all I could do was laugh and thought “well, fish DO float!”

With lots of water cleanup, I managed to salvage the mold and the head to put back in the freezer. Of course I used up my last bag of Potters’ Plaster and need to get more tomorrow. I’ll try and cast it again after I figure out how to keep a fish from floating… 

07 March

Take Care of the Tools That Take Care of You

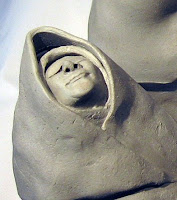
Here is a picture of four new "Woobie Souls" I made this week. First, I hand form the details in their faces using a variety of tools, then I slab roll the various "wrapping blankets." Most of the "Souls" are formed around recycled 20 oz. espresso cups. Joe and Christy from Windy Ridge Pottery recently shared their favorite throwing tools, inspired after Brandon Phillips did the same. Finding just the right tool has forced me to get innovative when it comes to wanting custom implements. I've read and observed in other studios that almost all artists, especially clay artists, end up forming their own tools from various raw and benign sources like CD's, Popsicle sticks, pencils or chicken wire to make that perfect mark or create that signature form. A few of my favorite wood trimming tools and ribs were gifted to me by mentors, teachers and experienced potters. I like to think that these gifted tools came with a special energy and experience that they're ready to share with me. I even scored an entire utility cartload of tools, glazes and various kiln parts from a garage sale for $15. Once washed up and sorted I now have plenty of extra tools for workshops or to gift to other artists just starting out.
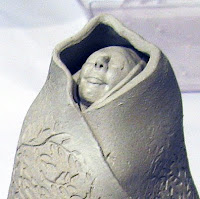
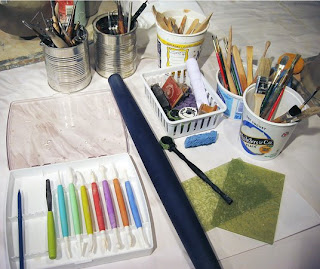
A few months ago at the craft store, I purchased several cake decorating tools that I thought would be perfect to use in clay. A group of tools that's seen a lot of use lately is a Fondant Paste Tool Set that I use to make the face details on the "Souls." Another is a Spiral Pattern Roller that I roll onto some of the slab blankets of the sculptures. Though I prefer natu
ral materials, especially wood, the precise details cut into the plastic tips of the Fondant tools are hard to replicate. I took a quick picture of some of my tools (after their bath) I used this week -all clean if only for the moment!  Another tool I love the feel of is my navy blue French Silicone Rolling Pin, (also in the photo) I got from Seattle Pottery Supply. I was taught early by my folks to take care of those things around me, no matter how small. Sometimes I listened to their advice, and well, other times... Thank goodness I valued and did take care of most of my old art supplies. One of the best wooden trim tools is from a set that my parents had to buy me for a high school ceramics class. I've never seen one quite like it, fits my hand perfectly and the wood is smooth and has an oil patina from age. Whenever I go to use it, it's like meeting an old friend.

10 February

Mixed Use Areas

Bringing clay into my studio has meant a lot of additional and varied types of clean-up. Mixing my mediums between clay and metal has meant mixing up my production schedule, work areas and tool use. I don't have the hang of it yet. I was so excited to glaze the new "Woobie Souls" but couldn't because my main work table was covered in other pieces in various stages of production. I had pieces that were getting finish patinas, wired and tagged. Earlier the table was my packaging and shipping station, then cleaned up and loaded with bisque items waiting to glazed. But before I could glaze I had more finishing to do on some wall sculptures that were due to a Gallery, so the bisque went back to the clay shelves...and so it goes. I haven't even brought any of the large steel wall sculptures in from the shop to get their enamel finishes yet because I want to do some slab work and I have clay everywhere...

31 January

Easy Does It

One of the new glazed, orange Rockfish I pulled from the kiln didn't survive...it wasn't the kiln's fault, I killed it trying to forcefully wire it to the metal base sculpture. I need to learn to be gentle when working with clay vs. how I horse the steel! I let out a cry as I broke him in half mounting the fish to a cool looking, welded steel and patina seascape. I'm too embarrassed to include a picture. Here is a picture of the Giant Alaska Sea Scallop that did survive getting mounted. I (gently) used reclaimed copper to wire the shell to the steel crab and starfish wall sculpture. The finished work is about 26" wide and 16" tall. The scallop was made using one of the plaster molds we made this last summer. I'm liking the clay/steel effect, but I need to do way more experimentation mixing the two mediums.

Art supplies are one of my weaknesses. For some women it's shoes or jewelry but for me it's power tools and supplies! BTW my husband thinks power tools are a great weakness to have...I purchased this vintage set of crayons from my friend Vicki on one of her ETSY sites, A Peaceful Life. Aren't they sweet! I especially loved the color of the petite box and was happy to be able to add them to my collection of vintage artist materials.

My electronic Bartlett Kiln Controller is still not functioning properly, leaving my new clay production anything but regular and predictable. There is an internal issue with something called MOV's and RF noise, which causes the kiln not to power up and maintain the firing properly. I do have some good people trying to solve this invisible and frustrating mystery. I admire Christine who is able "to get creative during setbacks." I want in on her secret...It's only January 31 of the new year and I think I have already lost sight of my New Year's goal...
Adopt the pace of Nature: her secret is patience.    
~Ralph Waldo Emerson

27 December

Wanting to feel the creative heat

Primarily as a metal artist working in steel, it was exactly a year ago I dreaded layering up in my Carhartt’s, slinging the frigid 4x8 sheets of steel up onto the cutting table, firing up my welder and plasma cutter and create some art. The concrete floor was as cold as the metal and I could see my breath, even in the heated shop. My creative mind romanced new thoughts of working in warmer “indoor” mediums when the North winds blew and the temps dipped below zero. I had been wanting to work in clay again, especially after an incredible Raku experience I had with Gina last Fall.

Combined with Alaska’s weather challenges that exist in my artmaking and wanting to add some sculptural elements to my steel pieces has lead me back to the medium of clay. I admit, working with a red-hot kiln and feeling warm clay from the earth has always appealed to me. Though it has taken a year to get set-up for the new medium addition to my studio, it has been worth it. I purchased a slab roller this last summer, a kiln this last fall and miscellaneous glazes and clay along the way. With the recent addition of an electric kiln being hard wired with an electronic temperature controller, additional exterior power and professional wiring in the shop I’m ready for the new creative HEAT!

One of the first loads in the kiln will be the clay fish sculptures I made from the press molds created this summer with Bill Sabo. The clay fish and tiles have been on the drying racks for over a month waiting for the kiln install. I’ve included some images from the Sabo-Shake mold making project. Bill is dad to the famous and talented Agnes Barton-Sabo or better known as The New Adventures of BettyTurbo at Etsy. Bill and I made molds using potters plaster and semi-frozen fish. I went on to make various seascape themed tile molds from starfish and sand dollars I have collected over the years and shells I found beach combing in Homer.

I will probably wait until after the New Year holiday when I’m back in the studio full time to have a couple of uninterrupted days for my first firing.